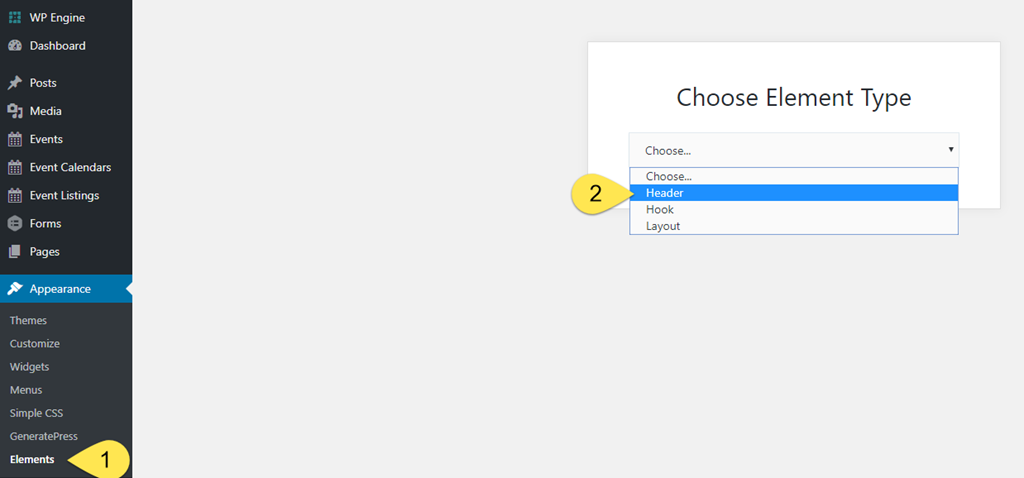
- To begin, navigate to Appearance>Elements
- Select “Header” from the element type dropdown
You’ll be taken to the Settings panel:

Element Classes
Add custom classes to the Page Hero element that you can use to target custom CSS.
Container
Choose whether your Page Hero outer container will be contained or full width.
Inner Container
Choose whether your Page Hero inner container will be contained or full width. In most cases, using “contained” is the better option.
Horizontal Alignment
This applies to any content (text, buttons, etc.) used in the hero.
Full Screen
This option will force your Page Hero to take up the entire viewport of your page. This is a great option to guarantee the hero image always occupies the full height available regardless if the user is on mobile or desktop.
Note: Requires Merge to be selected in Site Header tab.
Padding
Add padding to your Page Hero content. The padding value is taken from your content. Use the toggle to set different padding for desktop and mobile. We strongly recommend using at least some degree of padding.
Background Image
Add background image to your Page Hero content, you have two options:
- Featured Image: Use the Featured Image added in the pages or posts as the background image. You can also select a fallback image to show when no Featured Image is added in the individual page or post.
- Custom Image: Upload a custom image for this specific Page hero.
Both options work great and if you’re using the Full Screen setting above, custom images tend to work best.
Background Image Position
Set the position of the background image. this is an enormously useful setting and should be guided by the image used. In general, you want to select a position that corresponds with the image’s primary subject material. This will help keep as much of that primary content in the viewable screen area across all device types.
Note: Requires Featured Image or Custom Image to be selected.
Parallax
Enabling this option will apply a parallax effect (moves as you scroll) to your background image. This will reset the default background position in that the image will have more of the top section displayed on page load in order to accommodate the scrolling animation.
Note: Requires Featured Image or Custom Image to be selected.
Disable Featured Image
Disable the Featured Image on posts with this Page Hero.
Note: Requires Featured Image or Custom Image to be selected.
Background Overlay
Use the background color as a background overlay.
Note: Requires Featured Image or Custom Image to be selected.
Colors
Set the background color, text color and link colors for your Page Hero content.
Site Header
The Site Header settings provide the ability to layer the Page Hero below the header and navigation, use a custom version of your logo, and customize navigation colors.
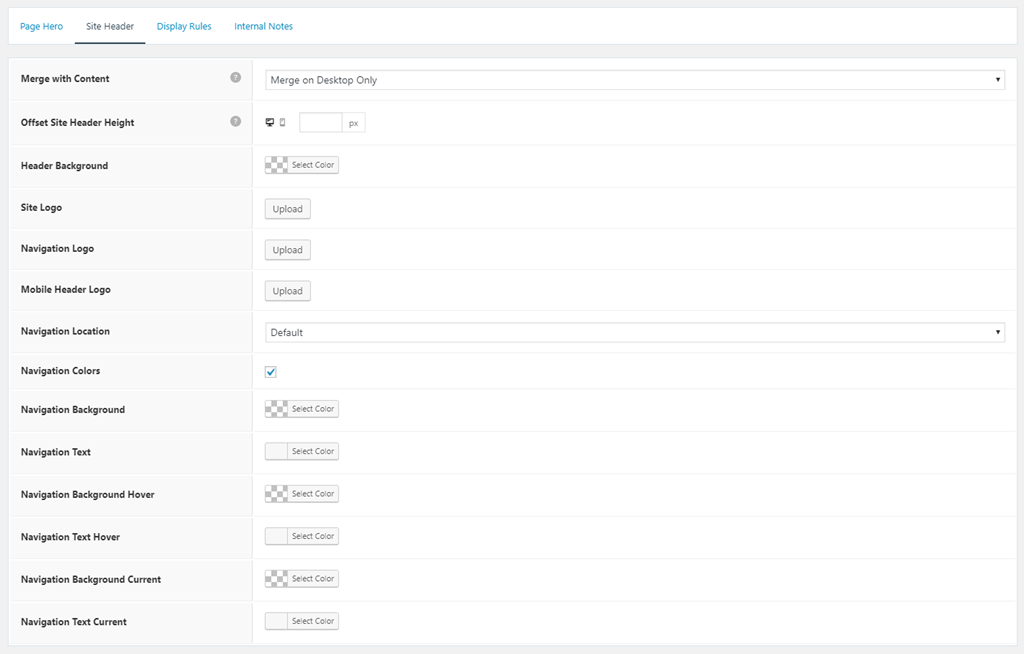
Merge with Content
Place your Page Hero behind header and navigation elements. You can opt to apply only on desktop or set to all device types. More details below on those options.
Offset Site Header Height
Add to the top padding of your Page Hero to prevent overlapping.
Header Background
Select the background color of your header with this Page Hero. You can make the background transparent by using the opacity slider.
Site Logo
Upload a different logo for this specific Page Hero. This is especially useful if Merge with Content option is enabled.
Note: Requires an existing logo uploaded in Site Logo.
Navigation Logo
Upload a different navigation logo for this specific Page Hero. This is especially useful if Merge with Content option is enabled.
Note: Requires an existing logo uploaded in Navigation Logo.
Navigation Location
Use a different navigation location than the global setting for this specific Page Hero.
Navigation Colors
Adjust the colors of your navigation so they match this Page Hero. You can make any background color transparent using the opacity slider.
Example:
The following is an example of using a Page Hero merged with content and setting all header and navigation items to transparent backgrounds:
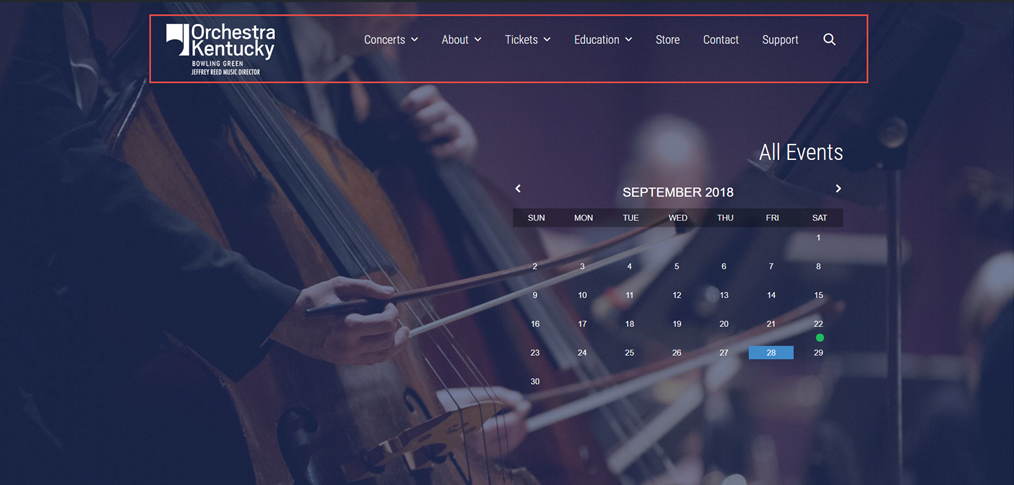
You can accomplish this look by setting the following items to zero transparency:
- Header Background
- Navigation Background
- Optionally, you can set the background hover colors to zero transparency as well
You can set transparency to zero by using the right slider tool and dragging it to the bottom-most position:
![]()
Display Rules
In order for your element to display anywhere on your website, you must set certain conditions within the Display Rules tab.
These settings allow you to display your element throughout your site. You can choose specific pages, posts, events, and even drill down into categories, tags, venues, etc.. You can go in the other direction and make an element display across your entire site.
You can also exclude the element using the same conditions. For example, you can tell your element to display throughout your entire site, excluding the About page.
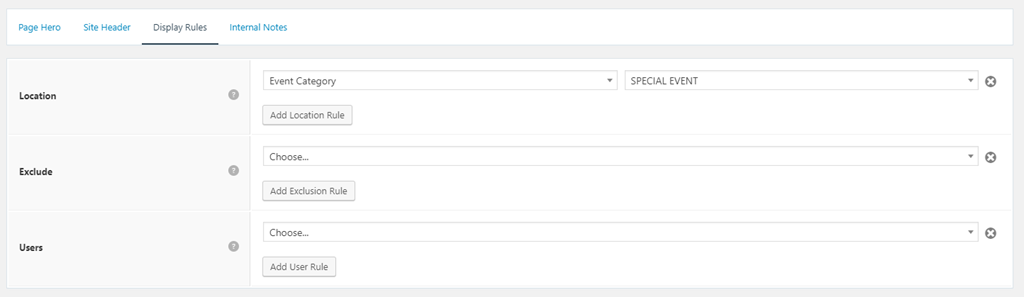
In the above example, the element has been set to only display on single event pages that have a “SPECIAL EVENT” event category assigned.
Location (required)
Choose when this element should display.
Exclude (optional)
Choose when this element should not display.
Users (optional)
Display element for specific user roles. this is only applicable for user that have a member or ecommerce driven frontend experience.